Category Archives: Nail Art
Paint splatter nails!
Feeling inspired by the arty digits seen by the athletes at the Olympics? Well here’s something quirky, fun yet super easy to do in under an hour!
All you need for this design is a toothpick, a piece of paper and a dotter (a pin head or ballpoint pen)!
First of all apply a base coat to your nails (of course I use Rimmel 5-in-1 nail care), then once that’s dry, apply a white or very light grey coat to your nails, make sure its opaque, apply another coat if it looks a little streaky. Then get the colours of your choice, choose your first colour then put a blob on the piece of paper, dip your dotter in the blob making sure its got a thick coating and then ‘dot’ it on to one of the corners of your nail, get the toothpick and take it to the centre of the dot on your nail and drag it outwards so it makes messy little lines. Don’t worry if you make a little mark in the centre as you can always go over it again with the dotter. Then with the remaining blob on the paper, dip the toothpick point in the blob and lightly dot around the larger streaked out dot on the nail, so it looks like a proper splatter, repeat this on the rest of the nails with the rest of the colours.. Have fun with this design! Overlay colours, mix up neons and pastels. Just have fun! Then when its all dry and dotted, just apply your top coat (mine is the Rimmel 5-in1 yet again.).
A little tip is to use one tooth pick for each colour, so 3 colours = 3 toothpicks but if you want multicolour splats then just use the same ‘pick!
I hope this was easy to follow, if you get a little stumped, there are also lots of tutorial videos on Youtube!
If you’ve tried out this design, I would love to see how you managed! Good luck 🙂
Wicked Queen Halfmoon’s
You’ve heard of the Girl with the Dragon Tattoo haven’t you? Well I think I’m slowly becoming the Girl With The Halfmoon Nails! I’ve almost done 3 designs in a row that are Halfmoon based and I think it will become my trademark.
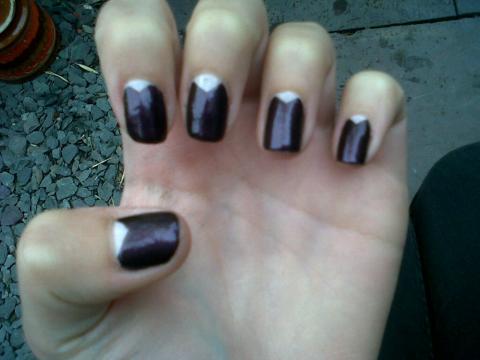
So this time around I got my inspiration from Disney’s Snow White. The Wicked Queen who compromises the innocence of the beautiful red apple that Snow White eats shortly after the spell has been cast on it. The Queen was my whole inspiration. I don’t remember what the Queen’s nails looked like in the film (they were probably red, as was the popular colour in that era), but I took my nail art to embody what I think the Queen really should have had on her talons.
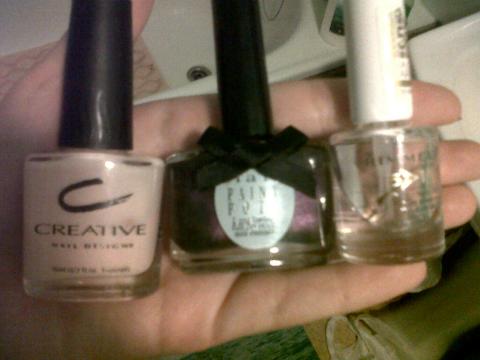
So I started with my Rimmel 5in1 base & top coat, as the base. Then I applied 2 coats of Creation’s 128, which is a light pink. You may have trouble getting your hands on this product as it came from overseas, so here is the Creation Store to help you. Then I got my Ciaté Wait Until Dark for the rich metallic aubergine. To get the ‘V’ in the halfmoon, twist your finger so that the hangnail is facing you. Its much easier to work using stokes going towards your body rather than away. Then get your polish brush and wipe the excess back in to the bottle. Line up the brush, so that its on the corner at the cuticle and diagonally follows the hangnail corner, so this means if you start at the top left nail corner of the cuticle, you end up at the bottom right corner of the hangnail. Once you’ve done the ‘V’ you can know in fill the rest of the nail, put a medium coat on as you don’t really want to have to go over it again and then once its dry, you can stick a top coat on.
If you have small nails or you want to do your pinky finger, instead of using the ‘wide’ side of your brush, tilt the brush to use the ‘narrow’ side, that way you get a larger ‘V’.
This design is great for those who want to experience the popular Spike shaped nail, glamorised by celebrities, but haven’t got the opportunity because of the commitment or hazardous nature, then you can have a Spike in your nail without the sharp!
As always I would be happy to see your pictures, tweet me the result @LeilaniDiana!
Good luck 🙂
Why nail art is so popular
Its pretty hard to not to notice the current trend at the moment, Nail Art. Its the trend that’s easy to do at home or cheap to get done at a salon.
If you’re having a nail art treatment on your natural nail then that can come in at under £10 for a full set of 10 which will last just under 14 days.
Nail art, unlike a hair cut is much cheaper and you don’t have to keep going back for expensive trims every 6 weeks. Nail Art also isn’t like clothes, you can wear your mini masterpieces all day everyday for a good 14 days if you wanted to, if you wore a new dress everyday then you would get some funny looks to say the least!
There have always been forms of Nail Art in the world and through the ages, with the Chinese a few centuries ago adorning their nails with intricate patterned extensions, now you can have your nails in a long spike fashion with tonnes of rhinestones chucked on top or a demure french manicure with flowers going down the side of the nail.
I haven’t taken a Nail Art course, for me, its just something that came naturally, I probably will take a course one day as they usually only last a few days.
Here is a Tumblr blog that showcases some of the best nail art in the world, take a look at fuckyeahnails for the designs that really make you go ‘wow’!
Don’t worry if you can’t recreate the beautiful looks to begin with, it takes time and (sometimes) patience, search YouTube for inspiration and never give up!
The best thing I can recommend is to start simple, with middle range, non-gloopy polish and always use a base coat.
Share your thoughts on nail art below! 🙂
Polka Dot Blue Halfmoon Manicure!
I got my inspiration for this design from the lovely Lovelynailsxx I wanted to try out a different sort of halfmoon and Polka Dot Halfmoon’s tutorial was right up my alley!
So I started with my must have base Rimmel 5in1 base & top coat, then I moved on to ‘Nail tip whitener’ by Natural Collection found at Boots I painted my entire nail with that using 2 coats, then when it was dry I used a proper average size natural bristle paintbrush to dip in to my Blue by Rio Nail Art, to do the halfmoons, I find that using a paintbrush for halfmoons much easier to manoeuvre opposed to the standard nail polish brushes, anyway that aside I then poured a little of the white on to a piece of paper and began with my dots (using my homemade dotting tool – a bobbypin opened up using the fat end for dots). I did a 3×3 dot design as my nails are rather short at the moment.
If you want to see my halfmoon video, which is basically how I do my ‘moons, nothing fancy, its here – Basic Halfmoon.
I really enjoyed doing this design and I will most defiantly come back to recreate this magic! Also, if you don’t want to do dots, then its fine to just leave the Blue & White halfmoons as they are, I thought that either way they looked super cute, just have fun, they’re your nails!
If you try the design out too, don’t forget to send me a photo link via Twitter or Photobucket!
Enjoy!
Newspaper nails
I got my inspiration for this design from the YouTube channel Cutepolish.
What you will need: A little jar that you can put a finger in, rubbing alcohol/surgical spirit and pre cut newspaper in a 2x2in square.
Start off by painting the nails a white or very very light grey colour. Put enough coats on so that its opaque, then when it is 100% dry (it’ll smudge if it isn’t fully dry) dip your finger in the jar with the rubbing alcohol/surgical spirit in for about 7 seconds, before you lift your finger out the jar, line up the piece of Newspaper with your other hand, take your finger out the jar then bam! Press the newspaper on the fingernail, firmly, but don’t let it slide, otherwise it will blur. Then when all 10 fingers are done, seal the nail design with a clear top coat. If you don’t, the ink will wash off. There you have it, Newspaper nails!
Here’s how the technique works:
The Rubbing alcohol/surgical spirit, softens the nail polish but doesn’t remove it like nail polish remover would.
A little tip I have for you is to get a little jar specially for your rubbing alcohol.. The best jar for this the one that face moisturisers come in, wait until you have an empty one, clean it out, then fill it up with the spirit, that way you will always have a handy jar! It never goes stale of out of date, so you can keep it for years as it sterilises itself!
Good luck and don’t forget to show me some pictures when you’ve tried it out!
Polka Dot french manicure
So I did this while ago, February to be precise! I had freshly turned 16 and I wanted something a bit different. Steering away from the regular white tip French manicure, I opted for something a little bit funky and shaken up!
I started off with my nail must have, Rimmel 5-1 base and top coat, applying my first coat of that, I then took to my Misstique (Teal) which is made by Missguided in the Nail splash range, to paint on the tip colour, I used its full brush and sweeped a backwards ‘c’ and then got a cotton stick dipped in nail varnish remover to straighten up the lines and the overspill on the side of my finger. I waited for that to dry and then took to the black Rio nail art bottle.. It has a built in thin brush, so I used the thin brush for the highlighting line just under the Teal. I then poured a bit of Black polish on some paper and dipped my DIY dotting tool (a pencil with a pin pushed in the eraser part) and created the polka dots with the pin head. When it was completely dried, I put a top coat of my Rimmel 5-in-1 on and that was it for 11 days! Because I had the black line under the Teal, it was about 2/4 of a millimetre before the hangnail, so no chipping and no real infilling to be done, fabulous!
Try it out and tell me what you think,I would love it if you switch up the colours! if you have Twitter, send me to the link of your photo reproducing the design!


